(How to design and build your own portaledge rainfly.)
![]()
I made my own single portaledge a number of years ago. I wanted to save money, and I enjoy building my own gear. (Although I built my portaledge out of aluminum tube, if you want to make your own portaledge, first have a look at Jeff Savoie's Krustyledge which is made of cheaper and easier to work with PVC pipe!) I had skipped making a rainfly because I thought it would be way too complicated. I was only planning on a couple of big walls in Yosemite in the summer months, and I had a very adequate bivy sack anyway. But the thought of having to sit for a whole day (or more) cooped up in a bivy sack didn't thrill me. In addition, the added "safety factor" of having two barriers between me and the elements was appealing (redundancy is a good idea when you are hanging on the side of a really big cliff). So without really knowing what I might be getting myself into (I still haven't seen a "real" rainfly in a deployed state, only pictures), I started to design a portaledge rainfly. Here's what I came up with:
What I thought might be fairly complicated to design, turned out to be very simple. The first step is to understand that making the fly "asymmetrical" is the simplest and best option. Being aymmetrical means that the side of the fly that is against the rock is designed to be vertical. This matches the typical set of angles at which your portaledge straps run when you have it set up on a wall. With that as the starting point, the design is no big deal. But you need to have a minimal understanding of geometry for that to be true. All important measurements turn out to be right triangles (you remember, the ones with one of the three angles being 90 degrees). The formula for the lengths of the sides of a right triangle is: the square of the length of the hypotenuse (the longest side, opposite the right angle) is equal to the sum of the squares of the other two sides (H²=S1²+S2²). Piece-o-cake!
Hoping to be able to locate six foot wide cloth (approx. 180 cm.), I
picked 150 cm. as my height on the wall side of the ledge (length D to
E in the diagram below). If you can't find cloth of that width, you are
going to have to splice it. (Incidentally for my prototype I was able to
get 180 cm. wide fabric, but the final version has a factory sealed "splice;"
more on that later.) Here is one source of fabric: http://www.seattlefabrics.com/nylons.html.
If you are going to need to splice it, then you can make the height of
the side on the wall even taller if you choose. Once you understand the
basis for calculating the measurements, you can make a whole bunch of changes
to the size and shape of your portaledge fly. But let's start out with
a very basic model.
(Disclaimer: I didn't really "make" this rainfly. I did all the design work and specified how it was to be built. But during my search for the "best fabric," I happened upon a tent making company that not only was willing to sell me the fabric (that they make in another one of their factories), but was willing to do all the stitching for me and tape the seams! That even included the shockcord and grommets. I think the company boss thought the whole project was so interesting that he decided to be helpful. In any case, I couldn't pass up the unbelievably low price they offered me, even if I lost out on the fun of making it myself. How much did it cost? Well, let's put it this way. I paid less for my "finished" fly than you will probably pay for just the tent fabric. (Don't even think of asking me to get the materials for you; I haven't got the time.) But what it should show you is that if you follow the directions, you should end up with a very functional portaledge rainfly. Incidentally I had to do all my communicating with the people at the company in Chinese (my Chinese is not that good either), and they had never seen a portaledge or a rainfly before. So if you start to think this is complicated, just think of how they must have felt!)
Parts list: (I'll put this here, but please completely read
and understand what this will entail before you go out and start buying
parts.)
Waterproof tent fabric (yellow fabric in the diagram below; size to be determined by your own calculations, but I'll tell you how to do that below)
Waterproof Cordura fabric (for the abrasion patches and stress points; green in the diagram below; size to be determined by your own calculations)
Heavy duty polyester or nylon thread and sewing machine needles to match
Two one inch grommets
Lightweight shockcord about the length of the perimeter of your portaledge
Two cord locks for the shockcord
1/2 inch flat webbing (three times the width of your portaledge with some excess)
Three 1/2 inch Fastex quick release buckles
Seam sealant
21 cm. x 5 cm. x 4 mm. aluminum plate
Four 5 mm. x 3 cm. long stainless steel bolts
Four 5 mm. stainless steel self-locking nuts (the ones with plastic inserts)
Please note: Your rainfly measurements
will only be the same as my measurements if your portaledge is exactly
the same size as mine. Don't try using my measurements for your ledge fly
and then complain that is doesn't fit. Of course it won't!
Here is the main diagram:
(I'll make a suggestion at this point: print out a copy of this main diagram so you can refer back to it as you read the rest of the article.)
Everything you see in yellow is one continuous piece of waterproof tent fabric. The black lines are not intended to denote seams; they do not. They are there to allow you to visualize where corners and folds will be. There are three "exposed" seams on this fly as diagrammed: Y to Z, B to T, and the half circle at the edge of the green cloth around D.
Since it still might not be clear to a few people how you turn this flat piece of fabric into a pyramid shaped portaledge fly, let me explain that when you are finished, point D will be the clip-in point and points A and U will be sewn together with a seam running from A/U up to D. If you can't imagine that, you probably ought to stop reading right now and go buy a commercially made portaledge fly and save yourself a lot of grief later. Another option is to print out the diagram, cut it out, then bend the two corners A and U together. Points H, F, E, G, I, and Q/R correspond to the points of suspension on a six point portaledge. There, that ought to do it.
The measurements are all based on my portaledge which is a custom 208 x 76 cm size (82 x 30 inches). Your measurements will of course vary. But adjusting the measurements to fit your ledge size is not very difficult. I would suggest that you add some length and width to your portaledge measurements to allow for fabric tightening as you sew the fly and to give your fly some slack as you are pulling it around your ledge. I added 2 cm. to the length and 4 cm. to the width which gave me nice round numbers to work with. That means all my design measurements are based on a 210 x 80 cm. portaledge.
Assume D to E is the previously stated height of 150 cm. from the clip-in point to the center of the wall side of the portaledge as it hangs on the wall. Lengths D to Q and D to R are the length of the front seam that will run from the clip-in point to the center of the outside of the ledge as it hangs on the wall. You will note that lengths Q to H and R to I are exactly half of your portaledge's overall length (overall length is F to G). But how will you figure the D to Q length? Simple. 150 squared is 22,500. The width of my ledge is 80 cm. 80 squared is 6,400. 22,500 + 6,400 = 28,900. The square root of 28,900 is 170. No problem. But you need to replace my 80 cm. measurement with the actual width of your portaledge to come up with the right numbers for you. So:
150² + (width of your ledge)² = (D-Q)²
Now, go ahead and finish the calculations for the rest of the lengths
from the clip-in point to the corners of the portaledge:
D-H = the square root of (D-Q)² + (Q-H)²
(D-I is the same length as D-H)
D-F = the square root of 150² + (E-F)²
(D-G is the same length as D-F)
Due to some amazing quirk of wizardry when performed in the tenth dimension, F-H will be exactly the measure of the width of your portaledge! ("I just love it when a plan comes together.") Now wasn't that easy?
"But wait!" you say, "You still haven't told us the full size of the piece of yellow fabric! How are we going to figure that out?" Ok, just add 50 cm. to your Q-R length, and you have the overall fabric length you'll need to buy (25 cm. more per side). To figure out the overall lengths of some of the "angled" corners (D-L, D-M, D-N, D-O), you could try to remember your high school geometry and calculate those out too. But I didn't bother. I just marked points F, G, H, & I and used a long straightedge (a wood 2 x 4) from point D to find marks L, M, N, & O. (Ok, to tell the truth, my vector drawing program gave me the numbers, but I wanted to come up with an easy way for you to do it.)
So what's with the 5 cm. strip of fabric at the top of the diagram (C-D)? That is to allow for a seam allowance as you sew the seam from P to D and S to D together. You really won't need this much cloth for a seam allowance. Don't get in a tizzy about it. Just use as much as you need and the fly will end up slightly longer on the outside edge than on the wall side edge. As you sew this seam later, you will notice that you can't quite get things to come together correctly at the very top of the clip-in point. Once again, don't worry about it. Just sew it as best you can and as close to the very top as you can. This little "hole" at the very top will be covered by another piece of fabric in the end, and it won't leak.
I arbitrarily decided to make my skirt (the part that folds around the bottom of your portaledge, not one of my "outfits") 20 cm. wide. Actually, I should admit that decision was based on the amount of cloth I had left over after subtracting the 150 cm. height from the overall fabric width of 180 cm. So measure E-X is 25 cm. There is 5 cm. flap left over as indicated by the dashed red line in the diagram. This is for folding back and stitching to make a 4 cm. wide "sleeve" all the way around the perimeter of the skirt for a pull cord. More on that later.
"Tent" fabric. This is really up to you. A storm on a wall can be severely harsh and can rip a lightweight fly to shreds. But if you use too heavy of fabric (as I did in my prototype), the fly can end up being 10 lb. by itself and impossible to stuff! You can go to your local fabric store and ask the clerk to show you the tent and tarp fabrics. Then pick one you believe will be sufficient. If you are headed off to solo a first ascent in Antarctica, you probably shouldn't be trying to "make do" and better buy one of the commercially made expedition flys. I'm counting on my bivy sack as the last line of defense, so I went with a polyurethane coated ripstop nylon fabric, something similar to what a lot of commercial tent flys are made of. It isn't the most lightweight because I wanted a little more strength, but it is relatively lightweight. I even had the option of using waterproof breathable Sympatex at a comparatively good price (when compared to Goretex), but I'm too cheap. I was just looking for a basic water barrier.
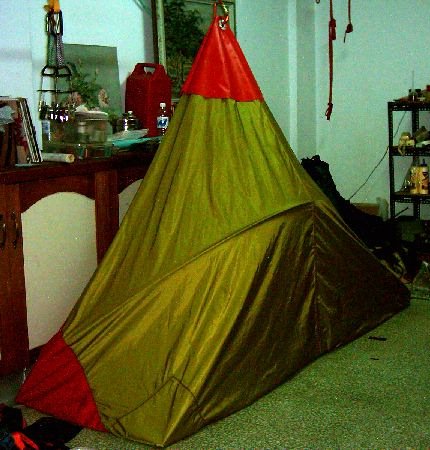
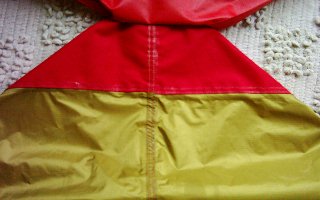
Abrasion protection. I didn't go "overkill" here either. In addition to the single piece of green fabric you see running the length of the bottom of the "back" of the fly, I do have two square patches sewn on the inside of the fly at points I and H to protect from abrasion from the corners of my portaledge (you can see the seams form these patches in the picture of my finished fly). You can add all the abrasion patches you want, inside or out, but remember, every seam, every stitch you put through your cloth is a potential spot for leaking. Additionally it will make the fly heavier and more bulky when you try to stuff it. But on the other hand, if you wear a hole through the fly while you are on the wall, it is certainly going to leak!
The fabric I used for abrasion patches is the equivalent of a heavy nylon tarp fabric with polyurethane coating on one side. I'm guessing it is something like the coated Cordura found in the fabric link above, but don't hold me to that; I haven't seen the Cordura they are selling. The easiest way to figure out the size of this piece is to simply measure the size of the area you want to cover on your tent fabric and buy it with enough extra for seam allowance. Ideally this would be one continuous length of cloth, but you have to waste a lot of cloth if you are only making one unit and it will increase your expense significantly. An option is to buy a piece of cloth 1/3 of the length you need and make two vertical splices that you seal inside and out before sewing it to the tent fabric. I suggest that whatever you do to splice it, don't end up with a seam at exactly the center of the side of your ledge. Typically this is a "thick" spot at the side of your portaledge frame and you don't want to add to the thickness and create more potential for wearing a hole. I made mine to be 40 cm. "tall" meaning that 15 cm. would end up tucked under the ledge and 25 cm. would be on the side "touching" the wall. I'll leave you to work out the exact measurements on your own. But you do want to have the tent fabric from W to X to be 10 cm. wide. This also means that H-N, F-L, G-M, & I-O are a bit longer than 10 cm. You could rework the numbers to fix it, but I would ignore it; it won't cause any trouble to have this little extra.
Before sewing the abrasion patch to the tent fabric, fold over a seam allowance (1.5 cm.) all the way around the edge and stitch it with a single row beside the cut edge of the cloth, away from the fold.
Here is what that seam will look like depending on if you need to splice
the tent fabric here or not:
Diagram 1 |

Diagram 2 |
Diagram 3 |
The first diagram is the simplest and requires the least layers of fabric, but is not as strong as the second diagram which will result if you follow the directions described above. The third diagram is to show how you can add a "splice" to your tent fabric (yellow fabric, if you can not locate 180 cm. wide fabric). But your sewing machine will need to be able to go through six layers of fabric, two of which are Cordura! This seam should be double stitched and sealed generously inside and out. For those of you who are still wondering why you want to do all that funky overlap with the tent fabric on the outside of the abrasion patch, I'll give you a hint: think about water in a rain gutter. Note: if you use the method as shown in Diagram 3, you will stitch this seam past the end of the abrasion patch, all the way to the edge of the tent fabric. This seam should have a double row of stitching.
Note: this seam will cause you to lose about 3 cm. of fabric between C and X. You can deal with this in a couple of ways. You can ignore it, and have a slightly shorter overall height when you are done. You can add 3 cm. of fabric to your C-X length before you trim it. You can move the abrasion patch up 3 cm. since the design has an oversized 5 cm. seam allowance along the A-C-U front seam.
This is a good place to mention seam sealing. I like a product made by Grangers Intl. It is simply called Seamsealant LP85. It has a chemical solvent and comes with a screw-on nozzle that allows for pinpoint accuracy of application as well as application into tight spots. I don't like water based sealants, and I hate that "easy-to-apply applicator top" on the Kenyon brand bottles. But, YMMV, so do what you want.
The "splice." Ok, let's face it, you are probably going to need to make one long splice in your tent fabric (yellow fabric). That's because it is really hard to locate 180 cm. wide cloth. At best, you are probably going to have to make do with 152 cm. fabric (60 inches or 5 feet). So where do you put the splice? Diagram 3 up above is one option. It is probably not a good option for very many people. First, it is very difficult to keep that much cloth together and aligned. Second, your sewing machine needs to be able to go through a whole lot of layers of cloth. So instead, I'd recommend the first step in your whole project to be sewing this splice at a position of about 5 cm. below the position of the top of the green abrasion patch (which is line Y to Z). That puts the splice at about 135 cm. from the top of the cloth. You might want to move it slightly lower to be away from the seam you need to make when you sew on the abrasion patch (diagrams 1 or 2 above). In the main diagram at the top of the page, there are two dashed blue lines indicating location of this seam depending on whether you integrate it into the abrasion patch seam (Diagram 3) or put it 5 cm. below that seam. The splice seam should look like this if it is set below the abrasion patch seam:
Even though this seam should never contact water because it is covered by the abrasion patch, seam seal it anyway, inside and out. This seam should also be sewn with two rows of stitching. Since I mentioned it above, I'll explain here that if you must make a splice anyway, consider the flexibility this will give you in you fly design. You are not forced to have it only 150 cm. tall. But think through all the ramifications of making any changes.
Diagram 4
Similar to the abrasion patch piece of cloth, this spliced on piece of tent fabric would ideally be one continuous piece. But you will waste a lot of fabric and raise your cost. So you can also splice it together vertically from shorter pieces. These seams should never contact water because they are covered by the abrasion patch, but go ahead and seal them anyway. (If you do this vertical splicing, don't even think about using Diagram 3 for the horizontal seam.)
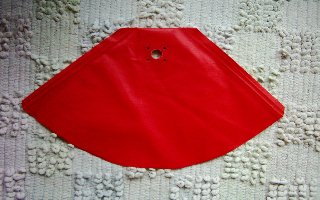
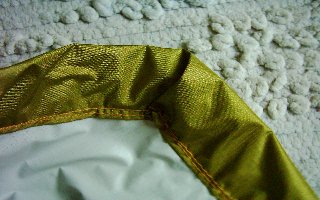
The clip-in point reinforcement. It's good to reinforce the fabric at the clip-in point. I did this in the diagram by making a "half circle" (with a little extra for the seam allowance) out of the same cloth I used for the abrasion protection along the back edge. It has a radius of 20 cm (D-AA). But you might want to vary that to accommodate "features" like a venting system. I'll explain the simple method only. You need to figure out any changes you want to make. Here's a picture of the top reinforcement. The top cap (see below) can be seen folded inside out so you can see the reinforcing patch.
First, fold over the edge of the arc 1.5 cm. and stitch it with a single row. Now lay it in place on the tent fabric and stitch through these two layer of thick fabric and one layer of tent fabric near the edge of the fold. Don't stitch the straight edge because that will get sewn in when you stitch the front seam. That's it. See the bottom of this article for a venting system option that is more complicated but might be of interest to you.
(Some of you might notice that my seam looks straight and not curved in the picture above. That is true; it is straight. It was an accommodation that I made for ease of taping the inside seam. If you aren't taping seams, a curve will look nicer and be less likely to create a stress point.)
The front seam. This is an important one. First bring A and U together to make sure the two sides of the seam will be equal in length (A-C and U-C). If so, start sewing at points A and U and go toward C. You should be using the same seam type as in Diagram 4 and you will want to have a double row of stitching when you are done. (See also the picture above.) Use as much fabric as you need to here; remember that you have up to 5 cm. seam allowance. As you approach point C, things will get tight. Just sew up as close as you can to point C and leave it at that. Spend plenty of time sealing this seam inside and out. To help keep the very top point of the fly more waterproof, you can fold it over a tiny bit and stitch it shut on the outside . Then seam seal this little seam. You should avoid getting this "thick spot" pinched into the clip-in plate when you assemble it later on or you won't get a good waterproof seal.
Here is one area to experiment with even before you start. Can your sewing machine go through all those layers of cloth near the top? There is a point in my picture above formed by the crossing of the vertical front seam and the horizontal seam at the bottom of the reinforcing fabric. Unless you have a commercial machine, you will probably need to really slow down and maybe even "hand-turn" your needle through this section. But experimenting ahead of time should help you figure out a way to deal with this.
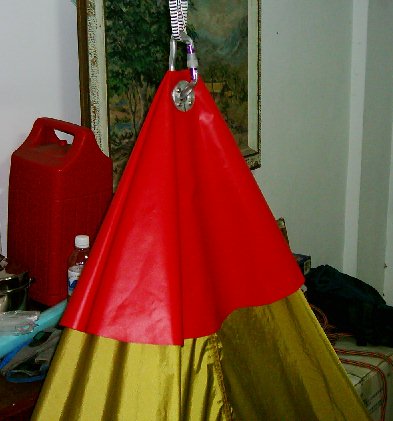
The top cap. This is what your are trying to make:
In the above picture the cap is turned inside out. The flat top area is folded, not stitched. Mine is made out of something similar to thin haulbag material. It is stiff and heavy and highly abrasion resistant. It's coated on both sides and it is factory welded down both straight edges, not sewn. You don't have to do it exactly the same way I did, especially because you probably don't have access to someone who can weld seams. Just use the same material you used for the top reinforcement and stitch it. I made mine to be about a 30 cm. radius. That way is covers not only the very top point but also covers the curved seam of the clip-in point reinforcement. It could even be made into an integrated stuff sack for the fly. In reality, the top cap is provided for redundancy and to guarantee a waterproof clip-in point. It could be made as minimally in size as just large enough to be bolted in place. It's up to you.
Here is a detail of the finished fly with the top cap on:
The skirt sleeve. The fold for the skirt sleeve is shown as a
red dashed line in the main diagram. It is simply 5 cm. from the edge of
the cloth with a 1 cm. seam allowance. It really only has to be wide enough
to accommodate your grommets and shockcord. Here are a couple of pictures
of the inside of the skirt:
 |
 |
The first picture is of a corner. Notice that right at the corner the fabric overlaps and has what appears to be an opening. It is an opening! Well, sort of. I pointed it out only to say that you will also have some extra cloth at the corner that you need to fold over as you sew. It's no big deal because this corner point is under your portaledge and on the inside of the fly. No need to get fancy here and try to trim the excess; just stitch over it. But remember, whatever you do, your goal in the end is to have a continuous 4 cm. wide "tube" running around the perimeter of your portaledge, so don't do anything that will close up that tube.
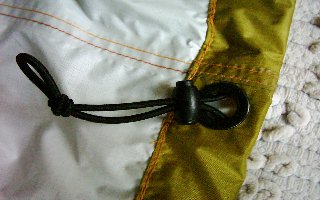
The second picture is a detail of the front center of the skirt (about at the connection of points A and U). This allows you to tighten or loosen the skirt of the fly under the ledge by reaching through the hole and pulling on the draw cord (assuming you have a portaledge with an opening in the bed material at the center where the suspension strap connects). I used shockcord for my drawstring so even if you don't have a hole here, you can still reach around the edge of the ledge to tighten or loosen it. There is an identical grommet at the opposite side of the rainfly at point X. This allows for two points of adjustment. What you can't see is that there is a patch of thicker fabric inside the sleeve through which the grommet passes. This is for extra strength instead of relying only on the thinner tent fabric to hold the grommet. This piece of fabric should be sewn into the sleeve seam for extra strength. You need to install these two grommets before you begin sewing the sleeve.
Tip: If you lay your drawcord into the sleeve while you are sewing it, you can save yourself the headache later of trying to feed it through the sleeve and around those corners.
"Tie-downs." For some of extra security against strong winds whipping your fly off of your ledge, you can use 1/2 inch flat webbing straps across the bottom of the width of the ledge (the shorter direction). These should have Fastex quick release buckles on one end. You should have three: one at point X (right beside that grommet) going across to beside the grommet at the opposite side (at the connection of points A and U) and two more that run parallel to the first but are about 20 cm. in from the ends of your portaledge (H-F and G-I). Again, you can access these through the holes in the corners of your bed fabric (depending on your bed design). For the added touch, sew an additional short loop of 1/2 inch flat webbing at a point about halfway between points N&L and M&O. Then you can thread the end two cross straps though these loops to keep the ends of the fly from being pulled off as well. But remember, don't stitch these straps on in any way that would sew the skirt sleeve shut. Use your head here.
Clip-in point. There are a number of ways to make a clip-in point. You can use a short runner and try to seal it to death. You can use some type of prussic around a nut jammed into the top. But I like the aluminum plate idea. Full credit goes to Metolius for coming up with the idea. I'm guessing they've patented it, so you should only be making this thing for your own use.
Here's my version:
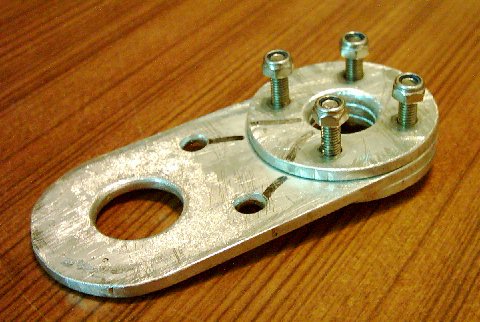
I used 5 mm. stainless bolts with self-locking nuts. 4 mm. bolts would probably suffice and be a bit lighter, but that's a little nitpicking. The bolts will be too long; you should carefully cut them off with a hacksaw when you are completely done building your fly and sand any sharp edges smooth. The aluminum plate is 4 mm. thick and you need a piece 21 cm. x 5 cm. I decided on 20 mm. wide carabiner holes because that allows me to pass the sleeve of my locking carabiners through the holes as well as provides for some slack for twisting of the clip-in biners. Make sure you smooth out all surfaces and edges by filing and sanding. I beveled the edges of the holes in the two outside discs so that the main point of contact for the top biner is on the center plate.
Now, put the main plate up inside to the top point of the fly and position it carefully. The front fabric seam will run straight down through the middle of the biner holes. Snug the fabric around the plate. Then using "feel," find a bolt hole and melt all the way though both sides of the fabric with a hot soldering iron. Repeat this process for the bolt hole diagonal to the first. Now insert those two bolts through the holes with both discs in place and tighten the nuts making sure the fabric is in position and not folded anywhere. Now go ahead and melt the other two bolt holes and the biner hole. You need to repeat this process with the top cap, making sure you leave yourself enough clearance to put it all together.
When you have the clip-in point completely done exactly as you want it, I'd recommend you take it back apart one more time and run a tiny bead of caulk between each of the fabric layers and the aluminum plates and then reassemble it for the final time. The biggest potential for leak is because of the variance of the thickness caused by the front seam. This might leave the slightest pinhole and allow leaking. Test it in the end by trying to force water into that point with a hose.
Venting system. Here's an option that I haven't done but that I'm considering. It would be fairly simple to add vent openings at the top of the rainfly, especially if you used a large top cap. I'm thinking of using some type of netting to provide at least a little support across the holes that would be created. Additionally the top cap could be made "oversized" and reinforced around the bottom edge with stiff cord from a lawn trimmer so that it stands out somewhat like an umbrella. It could be tacked down in a few places to keep it from inverting from a strong updraft. There are probably any number of good ways to do it. Maybe something like this:

Of course you could make the tube type vents that you see on many of the commercial flys which I think would be more waterproof.
Other options. How about windows? Zippered doors? Venting fans? Full-coverage diamond shape? Waterproof breathable fabrics? The options are out there to make this just as complicated or simple as you want. Once you understand the basic concept and design methods, there's a whole lot more you can do. But personally I lean toward KISS.
Have fun and stay tied in. ![]()
(If you find any errors in this article, please let me know, and I will be happy to fix them.)
![]()